The Event Booking Plugin Built for WordPress Communities

Create exclusive events, manage bookings, and connect your community with the power of BuddyBoss and WP Fusion. Perfect for membership sites, online communities, nonprofits, and organizations that require members to log in before registering.

Features

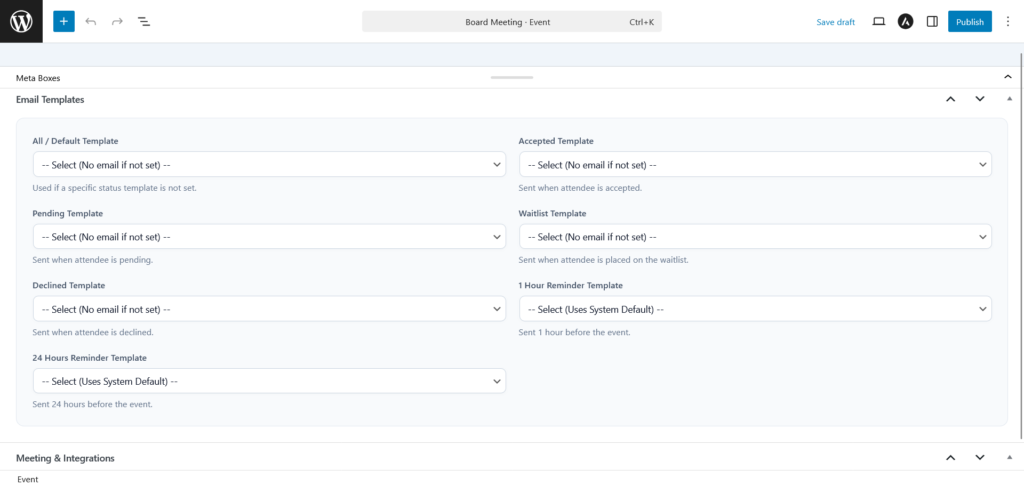
Email Templates

Send an email with different templates to attendance with different status to notify about the event they have registered

Meeting Integrations

Set up an offline event or using a short code with WP Jointly or create an external link for online event

Attendance Management

WP Booking Event allows you to manage the attendance that has registered with ease

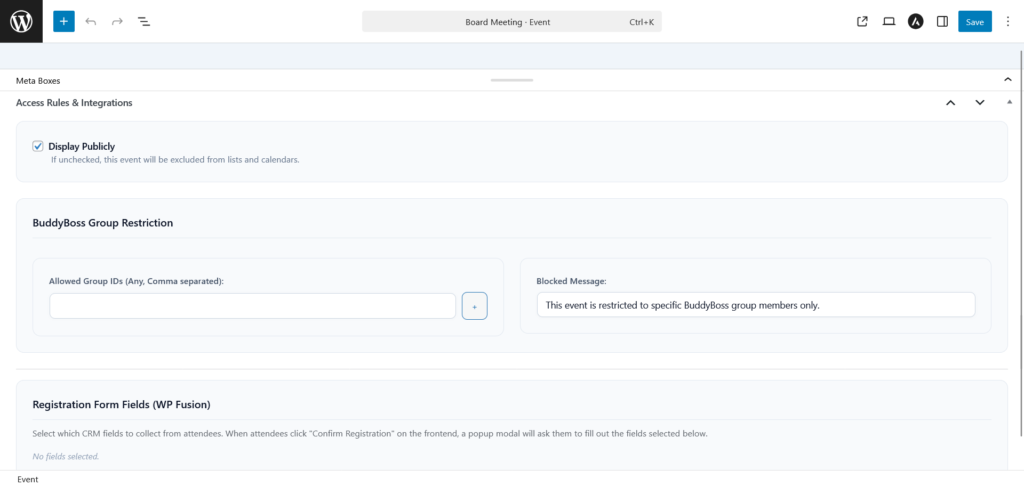
Access Integrations

Set up your accessibility for your event. WP Booking Event has integrated with WP Fusion and BuddyBoss

Date/Time Format

Control how dates and times are formatted globally across frontend event pages and automated emails.

Capacity Management

WP Event Booking allows you to customize the capacity of how many people can participate. From 1 to infinity

⭐️ Recommended Workflow

1. Define Schedule & Basic Details

Start by setting the event Date & Time (Schedule). Why? Because session dates are required for the countdown timer, calendar invites, and attendance tracking to function correctly.

2. Configure Meeting & Venue

Choose whether the event is Online or Offline. This dictates what information is displayed on the event page and sent in confirmation emails.

3. Set Capacity & Registration Rules

Define the Maximum Slots, Unlimited Signups, and the Default Signup Status. If you require manual approval, set the default status to Pending. If anyone can join instantly, set it to Accepted.

4. Map Email Templates

Once the core rules are set, assign your pre-created email templates to each status (Accepted, Pending, etc.) so the system can send automated emails immediately when a user registers.

5. Publish & Manage

Publish the event (ensure Display Publicly is checked). Later, use the Manage Attendees section to change user statuses and track session attendance.

1. Event Details

This section manages the core schedule, hosts, capacity, and registration behavior of the event.
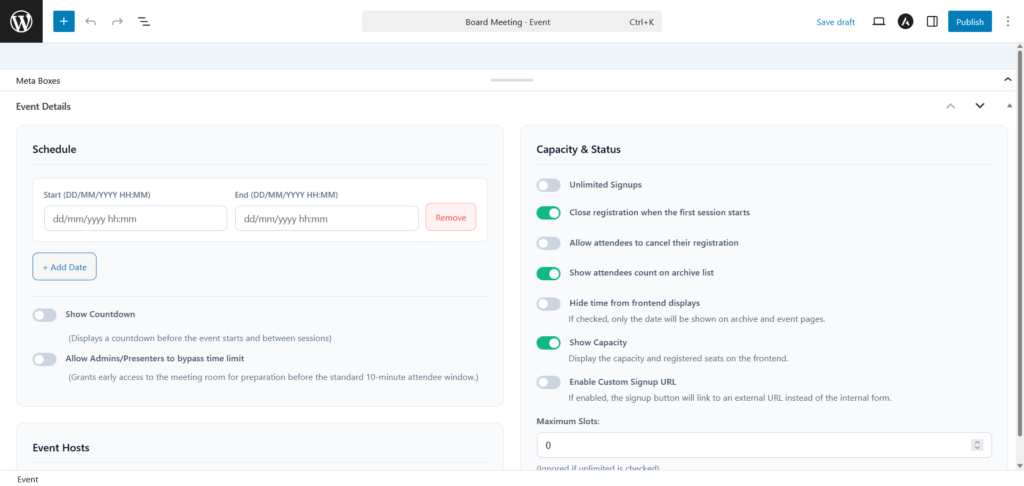
Schedule

  • Date Rows: You can add multiple dates and times (sessions).
    • Impact: Generates the event timeline. Attendees who are “Accepted” will have an attendance checkbox generated for each date row you create here.
  • Show Countdown:
    • Impact: Displays a live countdown timer on the frontend before the event starts and between sessions.
  • Allow Admins/Presenters to bypass time limit:
    • Impact: Overrides the standard 10-minute wait rule for hosts, allowing them to enter the meeting room immediately to prepare.

Event Hosts

  • Select/Add Hos:
    • Impact: Displays host profiles (avatar, name, bio) on the event page.
  • Send Attendees Details to Hosts:
    • Impact: Immediately triggers an email to the assigned hosts containing a list of currently registered attendees.

Capacity & Status

  • Unlimited Signups:
    • Impact: Hides the capacity limit on the frontend and allows infinite registrations.
  • Close registration when the first session starts:
    • Impact: The registration button automatically disappears/disables exactly when the Start Time of the first date row is reached.
  • Allow attendees to cancel their registration:
    • Impact: Adds a “Cancel” button on the user’s dashboard next to this event.
  • Show attendees count on archive list:
    • Impact: Adds a text indicator (e.g., “Total Attendees: 10”) on the event grid view.
  • Hide time from frontend displays:
    • Impact: Useful for all-day events. The time format is stripped from the frontend, showing only the date (e.g., 25/12/2026 instead of 25/12/2026 09:00).
  • Show Capacity:
    • Impact: Shows a progress bar or text (e.g., “50/100 Seats Booked”) on the event details page.
  • Enable Custom Signup URL:
    • Impact: Bypasses the plugin’s registration system completely. Clicking the “Register” button redirects the user to the specified URL (e.g., Google Form, Eventbrite).
  • Maximum Slots:
    • Impact: Once the number of “Accepted” and “Pending” signups reaches this number, the event shows as “Sold Out” or “Full”.
  • Default Signup Status:
    • Impact: Determines what happens when a user clicks register.
      • Accepted: User gets confirmed instantly and receives the Accepted email.
      • Pending: User is registered but must wait for admin approval (receives Pending email). Admin must manually change status later.
  • Redirect URL after Registration:
    • Impact: Instead of showing a success message on the same page, the browser redirects to the given link (useful for Thank You pages).

2. Email Templates

Assign specific email templates to trigger automatically based on attendee status changes. You must create these templates in the “Email Templates” menu first.

  • Impact: If a template is selected, the system will instantly send that email whenever the corresponding trigger occurs. If left empty, no email will be sent for that action.
  • Accepted, Pending, Waitlist, Declined: Triggers when an admin changes a user’s status, or when the default status applies during registration.
  • 1 Hour / 24 Hours Reminder: A background job (CRON) checks the event start time. If the current time hits exactly 1 hour or 24 hours before the first session, it sends this email to all “Accepted” attendees.

3. Meeting & Integrations

This part allows you to choose whether you want to have an online meeting or offline meeting
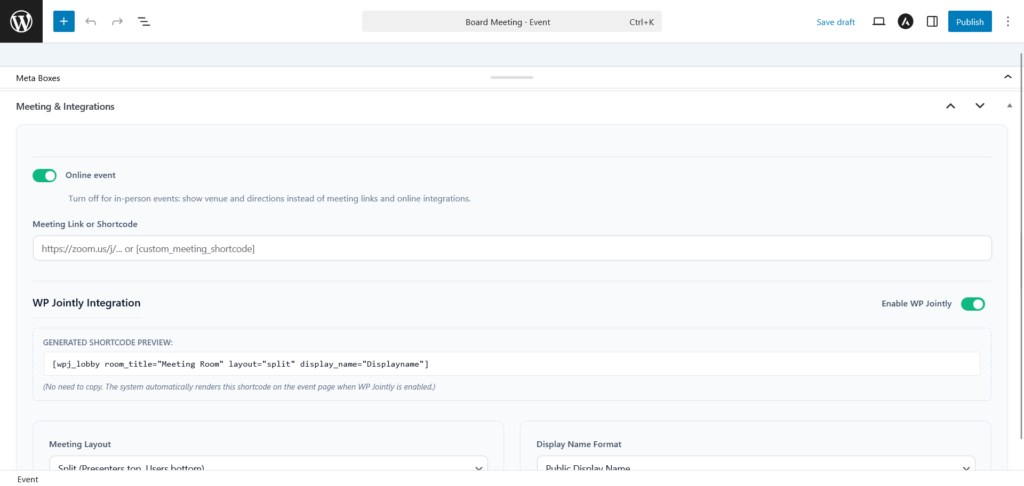
  • Online event:
    • Impac): Toggling this on reveals the Meeting URL field and hides physical venue fields. Toggling off does the reverse.

If Online:

  • Meeting Link or Shortcode:
    • Impact: The {meeting_url} placeholder in emails will populate with this link. On the frontend, the “Join Meeting” button will redirect here.

If Offline / In-person:

  • Venue details (Address, Map, Accessibility, etc.):
    • Impact: Displays a neat “Location Information” section on the single event page, complete with a clickable map link and instructions.

4. Access Rules & Integrations

This part allow use to set on who could participate this meeting with WP Fusion and BuddyBoss setting

  • Display Publicly:
    • Impact: If checked, the event appears on the main event list and calendars. If unchecked, the event can only be accessed via a direct URL link (hidden from the public list).

5. Manage Attendees

This table allows you to oversee and manage registered users.
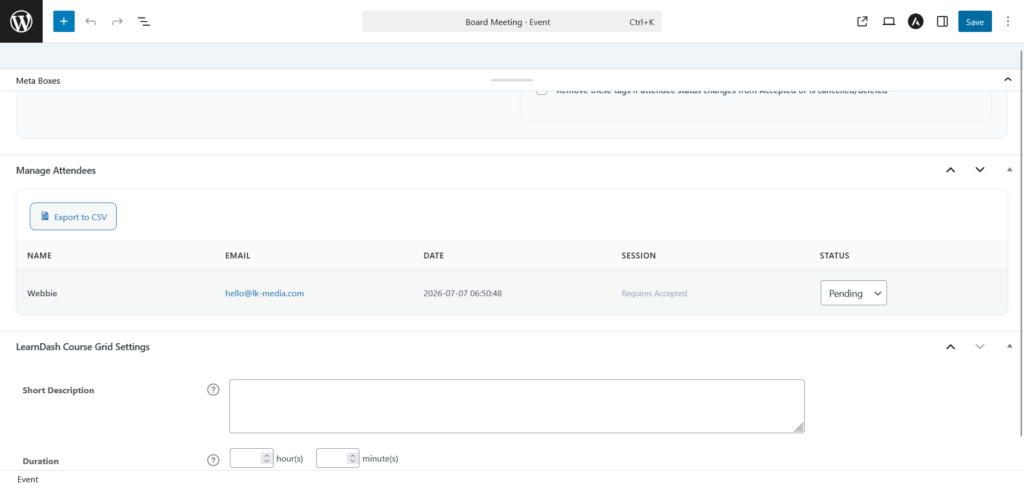
  • Session Attendance:
    • Impact: Checking a box (e.g., Session 1, 2) instantly saves the attendance record to the database via AJAX.
  • Status Management:
    • Impact: Changing the dropdown (e.g., Pending -> Accepted) and clicking “Save” will:
      1. Update the user’s status in the database.
      2. Recalculate the available event slots.
      3. Trigger the assigned email template (e.g., sending the “Accepted” email).
      4. Generate attendance checkboxes if changed to Accepted.
  • Delete:
    • Impact: Permanently removes the signup record. The user will no longer be registered, freeing up a capacity slot.

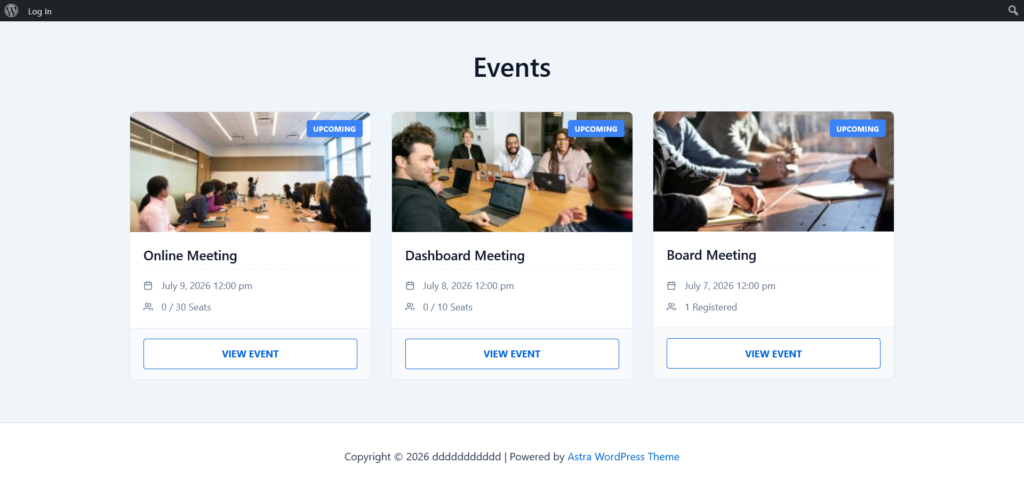
The WP Event Booking plugin provides three main shortcodes to display events and user dashboards across your website.

  • [wpeb_event]
    – Used to display a single, specific event page layout. This renders the modern 2-column interface containing the hero image, event content, and the sticky registration sidebar.
  • [wpeb]
    – Used to display a responsive grid/list of upcoming, publicly visible events. Any event that has already ended (Past status) is automatically hidden from this list.
  • [wpeb_user_dashboard]
    – Used to display a personalized dashboard for attendees. It shows a list of all events the logged-in user has registered for, their current attendance status (e.g., Accepted, Pending, Waitlist), and provides a “Cancel” action button (if the event administrator has allowed cancellations). If a user is not logged in, it will show a beautiful prompt asking them to log in.

WordPress Event Booking plugin

Want to try this plugin out?

Join the WP Event Booking launch list and get exclusive access to:

  • 🎥 A live product demo
  • 🎉 Up to 50% off your first year
  • 🚀 An exclusive Developer Lifetime License at a special launch price

Requirements

WP Jointly help you enable the meeting room with a simple short code and allow you customizing on how you want your meeting to look like.

WordPress – Add short code to any page or post and  start your meetings.

Contact Us